Mabinogi World Wiki is brought to you by Coty C., 808idiotz, our other patrons, and contributors like you!!
Keep this wiki going by contributing to our Patreon!
Shadow Mission Captain Assembly
- For other missions, see Category:Shadow Missions.
Description
- This mission is part of the Embattled Boss Event.
- Fight off four waves of monsters.
- The difficulty of the mission is fixed to basic.
- You will receive an end reward regardless of whether or not the mission was completed successfully given at least the 2nd round is completed.
- Upon entering the mission, five boss monsters spawn in a line.
- Once all players arrive in the arena, a random boss is selected to spawn to fight against you.
- After defeating the initial boss, an unattackable "frail" version of the boss will spawn. Your goal is to protect it.
- If the frail boss dies, the mission will fail.
- If too many enemies are on the field at once, the mission will fail.
- You may possess one of 4 Bisque Dolls given random talent skills and weapons to help in the fight.
- In order to control a Bisque Doll, you must use a Smiling Pumpkin, which are given for completing a round.
- The dolls respawn after every round.
- Upon completing a wave, you will receive a certain amount of EXP.
- Round 1 is 11,500 EXP.
- Round 2 is 33,000 EXP.
- Round 3 is 82,500 EXP.
- Round 4 is 148,500 EXP (completion EXP).
Mission Information
- Party Size: 3~6
- Time Limit: 1 hour
- Mission Difficulty: Basic
- Mission Details: It's time for Caravan Joe's Boss Shadow Mission! Have fun! - Caravan Joe -
- Info: Defeat the bosses.
Map
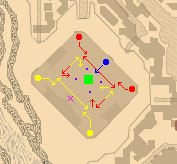
|
Tips
- Form a perimeter around the frail boss, using a team of AoE characters (i.e. - Windmill, Fireball, Act 4: Rising Action, etc.) and a few Archers with a high rank Crash Shot. Kill the stragglers as they pass by.
- To minimize spawns, have each red and yellow spawn point (indicated in the above map) occupied and kill the monsters when they appear. This is not recommended, however, as the boss loses most of its defenders.
- Once the Blinkers or Ghasts spawn, kill them immediately. They can be quite a hassle to both the entire team and the boss.
- If you are affected by Beholder Beam Attack, move away from the boss. The beam can and will do severe harm.
- All enemies have a high chance of entering deadly. Try not to mistake 100% wounding for death.
- Because the frail boss is a friendly NPC, it can be healed. Do so whenever possible.
- After every round is a short resting point. Use this time to prepare and recover.
- Explosions from the monsters do not hurt the boss, however they do hurt each other. This can prove beneficial with an Explosion Resistance set.
Monsters
Some of the monsters spawned are different than their original.
- Silver and Gold Bone Fighters, Lancers, Archers and Skeleton Squads are noticeably smaller and have no name.
- Blinkers spawn in variable sizes and they have a lot more Combat Power than regular Blinkers, making them much harder to hit with Sand Burst. They also cannot be targeted by Frozen Blast or Ice Spear, and cannot be frozen by Ice Breath or Ice Storm.
- Bomb Steeds and Skeleton Squads have a slightly smaller explosion range than normal.
- All monsters except the boss have a higher chance of entering Deadly status than normal monsters.
- 1st Wave (the boss you fight against is randomized)
- Arachne
- Arc Lich
- Armored Bear
- Bran
- Bunny Rag Doll
- Claimh Solas
- Cobweb Mummy
- Fennec Fox Rag Doll
- Giant Headless
- Ifrit
- Squirrel Rag Doll
- Skeleton Armor Ogre (Light Armor)
- Tabhartas
- Tethra
- Turtle
- Summons: Silver Bone Archer/Fighter/Lancer
- 2nd Wave
- 3rd and 4th Wave
Rewards
| Mission Difficulty |
EXP | Gold |
|---|---|---|
| Basic | 148,500 | 19,250 |
End Chest Rewards
Unlike normal shadow missions, regardless of whether or not the mission is completed successfully, given that at least the 2nd round is completed, one end chest will appear per player per round completed and one key will be given to each player for each round that is completed, not including the 1st round.
