Mabinogi World Wiki is brought to you by Coty C., 808idiotz, our other patrons, and contributors like you!!
Keep this wiki going by contributing to our Patreon!
Guide:Baltane Missions
Introduction
With the release of the Chain Slash talent and its related storyline and updates, we have gotten a new addition to the features present at Avalon's gate. The newest update gave us Baltane missions (not to be confused with training missions for squires.) These missions give good combat exp, broken divine weapons as well as playing a part in the skill quests for the final 2 Chain Slash skills, Raging Spike, Bachram Explosion.
Missions

Currently the missions are:
You can access these missions by talking to Shuan at Avalon Gate and then selecting the Baltane Missions option, then choosing mission you would like to go into. Each mission can be only done once per Erinn day which resets at 6:00 AM and you must be level 60 current to enter at the minimum. (Meaning you can enter all 6 missions once per Erinn day.) Combat exp from mission mobs is only earned from level 60 to level 99.
Chain Slash Related Notes
The Baltane missions are needed in order to obtain the skills Bachram Explosion and Raging Spike. For Bachram Explosion, you must obtain a Bachram Potential Page (1-4), which are dropped from mobs from missions 1-4. (1 page per mission is a rare drop possibility from mobs during a mission.)
In order to obtain Raging Spike, you must do two things. First of which is to clear Avalon Bridge Phase 4, the next is you need 3 Squire Uniform Boxes, one for Kaour, one for Eirlys and one for Dai. These boxes can be obtained by running either Avalon Bridge, where you have a chance to obtain them from opening Baltane Boxes purchased via the mission's "Crusader Points" or obtained from opening Baltane boxes from the Knights of the Round Table mission.
You cannot get any boxes or prizes from Nowhere to Run or Gatekeeper, only Bachram Potential Pages as a mob drop. These two missions also do not have a victory condition, other than lasting exactly 30 minutes. (You get a journal achievement for staying the whole 30.) As such Nowhere to Run is a good mission for leveling in, since it has endless mobs.
Avalon Bridge
Avalon Bridge is possibly the most complicated mission. The premise is simple, a basic defense mission at the entrance to Avalon Gate. When you go in, talk to Shuan to begin the mission.
This mission has a 30 minute clock to defend against 5 waves, each one increasing in mob count and speed. (Most players will find first 4 waves easy and wave 5 mildly difficult.)
You begin with 30 barrier spikes and 70 crusader points. The maximum points for this mission is 1750, if you complete wave 5 without any spikes lost.
You may redeem your points by speaking with Shuan after any wave and then exiting the mission.
You can also use your squires in order to help defend the bridge. Squires can be placed at by talking to Shaun and clicking the Command Squire button, then following instructions in order to place the squire, or enhance their abilities. Please keep in mind that this will also cost Crusader Points.
Each squire costs a different amount of points to place. (Note you will not hit be able to 1750 points if you command squires.)
When selecting where squires can go, there is 8 possible positions.
After placing Kanna, and starting the defense, mobs (Zombies, Disciples and Peridot animals) will spawn and you can begin killing. If the waves spawn too many mobs, you can use stun pets to keep it manageable. AoE skills such as Kunai Storm, Crash Shot, Chain Sweep and Shooting Rush, among others will help keep the spikes safe.
After each phase, you can enhance squire abilities or put down another squire if desired. Enhancing will increase squire attack and cost Crusader Points.
The points can also be used to buy Baltane Basic, Intermediate and Advanced Reward Boxes. These have a variety of items, including Squire's Uniform Box which are both for visual effects during the mission, as well as for getting Raging Spike.
If you do a perfect run of 1750 points, you can buy one of each box.
Gallery

The stast of Avalon Bridge, before the first wave

Mission stats

Squire selection screen.
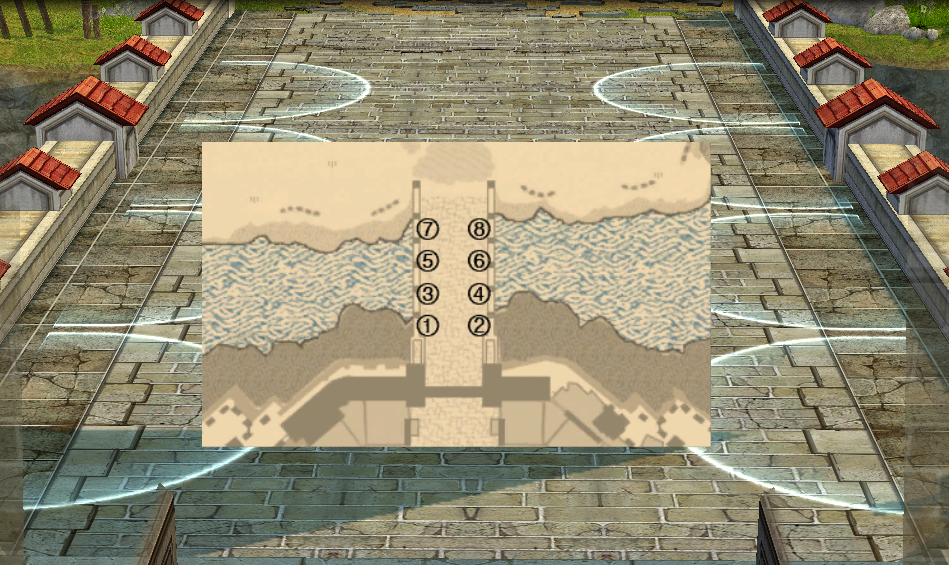
Positions for each Squire

Kanna placed at position 1
- Avalon Bridge squire enhance.png
Enhance squire screen.

Squire Uniform Boxes.


Nowhere to Run

In this mission, you are placed in front of Avalon Bridge (which has barrier spikes and all the squires behind them). The point of this mission is to simply kill all the mobs that spawn. Mob spawn does not stop and the whole mission lasts 30 minutes. After every 50 mobs, a large Peridot creature will spawn. This animal has a chance to drop Bachram Potential Page 2 (for Bachram Explosion Skill Quest). The mission itself is full of 3-4 types of zombies, some of which explode. Since mobs endlessly spawn, it's a good mission for leveling if you would like to go from 60-99. Utilizing a Combat 2x EXP Potion is suggested to gain more experience. Humans will find that Final Hit is useful, but requires you to teleport quickly between mobs to avoid explosions. Ninja and Chain Slash would also be effective at clearing mobs with AoE skills.

Knights of the Round Table
In this mission you must first clear out the enemies occupying the Round Table, then defend against further attacks while the Charm hidden in the round table is sealed up again.
The two main mechanics of this mission are the Sealing and Damage meters.
If the charm sustains too much damage, the mission will end as a failure (although you get prizes based on seal percentage).
Obtaining 100% seal will end the mission as a victory and result in 2 Alban Knights Advanced Reward Boxes and 1 Alban Knights Elite Reward Box.

The mission starts off with you outside the Round Table. Break through the barrier spikes surrounding the table, then kill all the enemies inside.

After reclaiming the Round Table, you will have to defend while the spikes are being built. Quick ranged attacks and pet summons will help here.

After the barricade is built, you will need to hold the line and defend against an onslaught of attacks from Crystal Wolves and Reanimated Corpses.
At this point you can see the Charm Sealing Rate which will build up to 100% over time. At certain intervals the prize you can get will change.

Occasionally during the mission a Giant Peridot Crystal Bear will spawn in the center of the map, which should be killed as soon as possible.
If at any point during the mission an enemy reaches the other side of the barricade, you will be warped back to Avalon Gate's entrance and have to reclaim the Round Table once again in order to resume sealing the charm.
Gatekeeper
In this mission, you have four locations to defend:
- Avalon's Gate Front.
- Round Table's Front.
- Eastern Training Zone.
- Western Training Zone.
Each of these zones has a defense percentage that goes down when mobs are there, and naturally goes up after mobs are cleared out.

You can move around Avalon Gate by stepping on the symbols in front of each zone, which will take you the zone on either left or right side of the current one. Symbols show an Alban Knights Emblem on the ground.
This mission has a 30 minute timer and no win condition, the purpose of the mission is just to kill monsters.
Counterattack
- The mission starts at the entrance of Avalon Gate. After some dialogue, enemies will spawn and a fight breaks out between them and the Baltane Squad.
- Once all enemies are defeated, Shuan explains that the goal of the mission is to locate a Giant Peridot Crystal Boar, Giant Peridot Crystal Bear, or Giant Peridot Crystal Wolf and defeat it. He will ask you to assign pairs to the squads to split everyone up.
- If a squad member is defeated in the opening, they cannot be used in the pairing.
- Certain squad pairings provide a buff.
- Logan's Heart of Gold (Logan ✖ Anyone): Logan's partner recovers their HP after every area cleared without the player's help.
- Debutantes (Kanna ✖ Eirlys): Kanna's HP is increased and Eirlys' attack is increased.
- Dogged Destroyers (Kanna ✖ Dai): Kanna's and Dai's attack are greatly increased, but their HP is decreased.
- Reliable Ones (Dai ✖ Kaour): Kaour's and Dai's HP are greatly increased, but their attack is decreased.
- A Pair of Scalawags (Eirlys ✖ Kaour): Eirlys' and Kaour's attack are increased.
- The Shy and the Hated Guy (Elsie ✖ Dai): Elsie's attack is greatly increased, but Dai's HP is decreased.
- If a member of a pairing is defeated, the buff will cease.
- If all squad members fall in battle, the mission will fail.
- After pairing all the squires, you will begin traveling to various maps similar to Alban Knights Training Grounds and will have to clear two waves of monsters each map. After clearing a map, you may proceed to clear maps alone or assist the squires.
- A UI will appear indicating each squad member's health, their location, and their progress in that area.
- A Sneaky Disciples of the Prophets always spawns in a random map, this monster always drops useful rewards when defeated.
- Once the boss is defeated, the mission will immediately be cleared, and a reward chest will spawn on the players feet.
- When the boss reaches a certain health, prophets will spawn. The prophets will stand in place channeling a strange light, if they are not defeated quickly they will give the boss various buffs including health regeneration, Heavy Stander, Mana Deflector, and Natural Shield.
Siege Weapon
Conclusion
That is a simple guide to how Baltane missions work and the rewards from them. Thank you to anyone who gave data, images or clarification for this guide.