- For the in-game script of this Generation, see Script - Generation 11: Sword of the Gods.
< Generation 10: Goddess of Light Generation 12: Return of the Hero >

|
This article contains spoilers.
If you do not wish to read further, please return to the home page.
|

|
- To start Generation 11, you must have completed Generation 10 or get your cumulative level to 380 and talk to Duncan.
|
Generation 11: Sword of the Gods is the third part of Chapter 3. Mostly taking place in Rath Royal Castle, the Partholons and Neamhain plan to acquire the Brionac, a legendary sword that the Gods treasured, for their nefarious deeds.
Changes in Generation 11 Due to Updates
- All Shadow Missions have been rebalanced and fixed at Intermediate Difficulty (Jenna in Danger, Jenna's Revenge, and Location of Destiny are exceptions to this).
- Most Shadow Missions have drastically lowered EXP rewards.
- Any Shadow Mission that takes place in outdoors will have a supply chest at the start of the mission.
- During The Disappearance of Buchanan, the Book Dealer, finishing your conversation with Aeira will result in a Wings of the Blue Goddess to Tara's Stonehenge.
- During Alchemist Medal, the Shadow Missions, Alchemist Medal and The Pain of Love now allows two other non-Royal Alchemist players to enter.
- During In Search of Jenna, Collen gives you a Wings of the Blue Goddess to Tara's Stonehenge in addition to Neamhain's Talisman.
- During The Song of Partholon, you will be rewarded a Wings of the Blue Goddess to Tara's Stonehenge after the completion of Ciar Dungeon.
- The Shadow Mission Buchanan Inside the Castle and The Hidden Book of Partholon has reduced spawns.
- The Shadow Mission Seven Pages now has Leprechauns as a normal spawn in addition to the Boss spawn.
- There is also a reduction in spawns.
- During the quest Partholon Stone, you are given a Red Wing of the Goddess to Calida Exploration Camp after talking to Sinead and after clearing the Special Peaca Dungeon.
- You are also given a Wings of the Blue Goddess to Emain Macha after talking to Belita.
- During Uroborus, the Shadow Mission Final Chapter now allows two other non-Royal Alchemist players to enter.
NPCs involved in Sword of the Gods
NPCs involved in Sword of the Gods
The Disappearance of Buchanan, the Book Dealer


|
Name
|
The Disappearance of Buchanan, the Book Dealer
|
NPC
|
Aeira, Arzhela
|
| Information
|
Before the quest, you will get a cutscene. After the cutscene, wait a short while for the quest to arrive.
|
| Instruction
|
 The Parthalonians fleeing the plague. - Talk to Aeira to receive Buchanan's Library Pass (1x2).
- Go to Dunbarton's Library and look at the Humanities bookshelf to find a Dunbarton Library Card (1x2). You will lose Buchanan's Library Pass as you enter the Library.
- If you accidentally leave before obtaining the card, you may talk to Aeira for another another library pass.
- Talk to Aeira to give her the library card. You will receive a Wings of the Blue Goddess to Tara's Stonehenge.
- Talk to Arzhela inside the Tara Rath Castle on the second floor's library and receive a special Monocle. It is bound to the player and the only way to get rid of it is to destroy it.
- If you destroy your Monocle before completing the task, you may receive another by talking to Arzhela. You may also use a purchased Monocle for the same task.
- Go into the Shadow Realm of Tara Rath Castle and look for an Ancient Book found randomly in one of the rooms. You may pick any mission at any difficulty from the following: The Other Alchemists, Fomor Attack, Ghost of Partholon. You don't need to complete the mission after obtaining a book. You can also obtain the book from another player.
- You may only see and pick up an Ancient Book by wearing a monocle. Without equipping a monocle, the ancient book will appear as a glowing spot on the floor in one of the rooms of the shadow mission.
- Do not confuse a Strange Book for an Ancient Book. A strange book can be obtained on the floor of a room after defeating a group of Strange Book enemies. An ancient book will already be in a room before you arrive, and can be picked up before any fighting.
- When talking to Arzhela, choose the option "Donate Ancient Book" to give her the book.
- Talk to Arzhela again to receive the Royal Library Card (1x2) and the solo Shadow Mission Royal Library Investigation.
- Talk to Arzhela and she will take your library card. Complete the quest (35,000 EXP) Wait for the next quest.
|
The Royal Chef


|
Name
|
The Royal Chef
|
NPC
|
Glewyas, Iron Pot
|
| Information
|
I hear you're seeking news on Buchanan. I have a few things I can tell you about him. -Glewyas
|
| Instruction
|
- Talk to Glewyas. He will give you the Hotcake of Love Recipe, which is a Kitchen Dungeon pass.
- Complete Gleyas's Recipe Book.
- Talk to the Iron Pot and choose the pass to enter the "Make a Hotcake of Love" solo dungeon.
- You may Read the Kitchen Dungeon page for better understanding of it.
- The Recipe calls for 4 Berry, 6 Wheat Flour, and 3 Egg cooked for 3 minutes.
- It is not required to hit the exact amount of ingredients listed.
- It is more important to hit the wooden fork as close to 3 minutes elapsing (around 7 minutes remaining mission time) than it is to get the exact amount of each ingredient.
- The star rating required for completion varies by your character's level. The amount of score required per star rating is as follows.
- 0~49: 2 stars
- 50~74: 3 stars
- 75~90: 4 stars
- 91~100: 5 Stars
- Ingredients will have high protection until they are hit by Glewyas or by a Cooking Knife, obtainable through Silver Tablewares. It is advised that you obtain a cooking knife from tablewares and use it weaken ingredients before defeating them.
- If you are successful, a chest will appear. Open it to obtain the Hotcake of Love.
- If you fail the kitchen dungeon, talk to Glewyas to receive another pass.
- Talk to Glewyas.
- You are required to have the completed Hotcake of Love, but it will not be given to him. If he accepts it, you will obtain Glewyas's Mythril Chef Recipe Book, otherwise you will get the pass again.
- Successfully read Glewyas's Mythril Chef Recipe Book.
- Talk to Buchanan in the Shadow Realm.
- Complete the solo Shadow Mission, Buchanan's Secret. A Royal Alchemist may assist you.
- The only monster is 8 Strange Books. You don't have to defeat all the books; just get the key from one of them and then enter the library. A cutscene will play, then the mission will complete and automatically exit.
- If you give up or could not obtain the mission, use the Royal Library Card to obtain the mission again.
- Complete the quest (15,000 EXP) and wait for the next one.
|
Alchemist Medal


|
Name
|
Alchemist Medal
|
NPC
|
Sinead, Cai, Leymore
|
| Information
|
|
| Instruction
|
- Talk to Sinead to receive Alchemist Medal (1x2) and Tara shadow mission, Alchemist Medal. You may bring up to two players to assist you. All players can get credit for the quest objective as long as they talk to Cai at the end.
- The mission takes place in Rath Royal Castle. You will clear 11 rooms.
- Clear the rooms and then talk to Cai at the upper right room to complete the mission. Exit the mission manually.
- Talk to Sinead to receive the Taillteann shadow mission, The Pain of Love. You may bring up to two players to assist you. Only the player who talks to Leymore at the end will get credit for the quest objective.
- You will start outside the west gate of Taillteann. Head to behind the Alchemy building to find Leymore and talk to him.
- You are not required to defeat the enemies at the gate and can simply run past them.
- When speaking to Leymore, 3 enemies will appear: Shadow Lancer, Shadow Warrior, Shadow Archer. Defeat them.
- After defeating the enemies, talk to Leymore again to receive Jenna's Letter (2x2) and clear the mission. Exit the mission manually.
- Read Jenna's Letter to view a cutscene.
- Complete the quest (12,000 EXP) to receive a Waxen Wing of the Blue Goddess to Taillteann's Stonehenge. Wait for the next quest.
|
In Search of Jenna

|
Name
|
In Search of Jenna
|
NPC
|
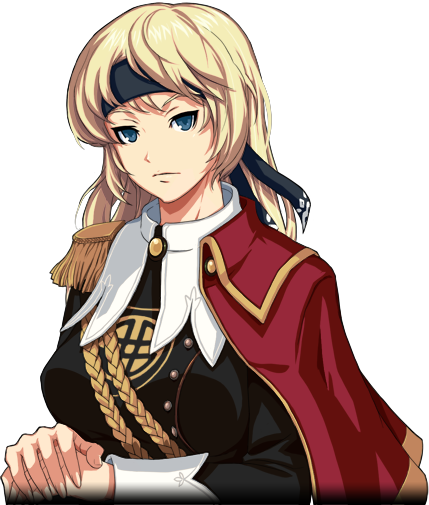
Jenna
|
| Information
|
|
| Instruction
|
- Talk to Collen in Taillteann to receive Neamhain's Talisman (2x2) and Wings of the Blue Goddess to Tara's Stonehenge.
- If the RP mission is abandoned or lost, it can be reissued by speaking to Collen again.
- Complete the Jenna's Revenge RP mission at Tara's altar.
- The difficulty is fixed on Basic.
- Jenna is equipped with dual broadswords and a bow. Using Final Hit with the broadswords should be sufficient to defeat most enemies but you will still want to set up your hotkeys to fall back on basic melee skills.
- You will start outside of the Great Hall of Rath Royal Castle. Enter when ready.
- You must defeat ten Corrupt Alchemists, five per wave.
- Using Final Hit is highly recommended and it should last you long enough to defeat at least 8 corrupt alchemists.
- After defeating them, a cutscene will occur and the mission will exit.
- Complete the quest (10,000 EXP) and wait for the next one.
|
Evolution of the Caliburn
|
Name
|
Evolution of the Caliburn
|
NPC
|
Sinead, Cai, Leymore, Morrighan
|
| Information
|
|
| Instruction
|
- Go to Rath Royal Castle, talk to Sinead to receive the Tara shadow mission, Investigating Traces of the Caliburn.
- You may bring a Royal Alchemist to assist you.
- You will be assisted by Cai and Leymore. If either dies, the mission will fail.
- Both Alchemists have bad AI, you should not rely on them. Be sure to heal and cure their wounds should they take a lot of damage.
- After talking to Leymore, 3 orbs will appear in the room that will begin the fight. After the 3 groups are defeated, 3 more orbs will appear.
- There are 10 orbs in total. The 10th orb will spawn a Shadow Commander along with minions.
- Morrighan will appear after all enemies are defeated. Talk to her to clear the mission. Exit the mission manually.
- If you leave before talking to Morrighan, you will need to talk to Sinead to receive the mission again.
- Complete the quest (15,000 EXP) and wait for the next one.
|
The Song of Partholon


|
Name
|
The Song of Partholon
|
NPC
|
Briana, Buchanan
|
| Information
|
|
| Instruction
|
- Talk to Briana and receive a Parthalonian Artifact (1x1) and a Red Wings of the Goddess to Ciar Dungeon. This is a solo dungeon.
- Drop the Partholonian Artifact onto the normal Ciar altar. The dungeon has no boss.
- This dungeon is basically a shorter version Ciar Intermediate and only has one floor.
- Open the chest first to get your reward, then talk to Buchanan at the boss room. You will then be instantly removed from the dungeon.
- Do not leave via the goddess statue or you will have to redo the quest.
- Completing the objective will reward you with a Wings of the Blue Goddess to Tara's Stonehenge. Don't use it, you will need to go back to Brianna and are better served by using Moon Gates.
- If you fail to complete the dungeon and quest objective, talk to Briana for another relic.
- Talk to Briana. Listen to the music she composed. She will ask if you enjoyed it or not afterwards.
- If you answer yes then she will give you a score scroll titled "Parthalonian Prince" that is Grade A difficulty. If you say it was mediocre at best, you will not receive the score. You can also listen to it again by talking to Briana.
- Complete the quest (15,000 EXP) and wait for the next one.
|
Buchanan in the Shadow Realm

|
Name
|
Buchanan in the Shadow Realm
|
NPC
|
Sinead, Cai, Leymore
|
| Information
|
You will be running practically the entire first floor of the castle. Both missions received during this quest is solo, however, the second one allows assistance of a Royal Alchemist. In the case that you die, you must either use Nao, or have a spotter with Advanced Phoenix Feathers in hand. Be well prepared as both Shadow Missions are rather long. You are to keep both Cai and Leymore alive at all costs. It is wise to heal them after every room.
Ideally, you will first want to take out any Shadow Bone Archers or Shadow Wizards that spawn. They are the most damaging to the Alchemists as well as yourself, so take extra caution.
|
| Instruction
|
- Talk to Sinead to receive the Shadow Mission, Buchanan Inside the Castle. This is a solo mission.
- You will be assisted by Cai and Leymore. If either die, the mission will fail.
- Speak to Cai and Leymore to begin the mission and have them follow you.
- There are 18 rooms that must be completed. Buchanan will be found in the boss room.
- Talk to Buchanan to clear the mission. Manually exit the mission.
- Talk to Sinead to receive the solo Shadow Mission, The Hidden Book of Partholon. A Royal Alchemist may assist you.
- You will be assisted by Cai and Leymore. If either die, the mission will fail.
- Speak to Cai and Leymore to begin the mission and have them follow you.
- Similar to the previous mission, there are 16 rooms that must be completed here.
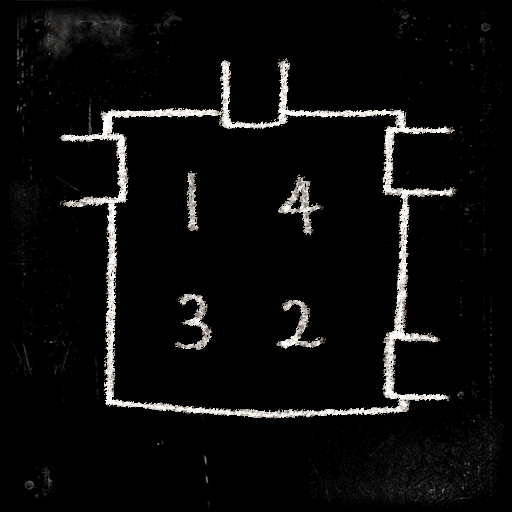
- Hit the switches in the Dining Room in the order on the map below. Face your camera to the north or use the doorways in the image below to orient the camera in the proper direction to figure out which switch is which.
- Failure to hit the switches in the proper order will result in mobs being spawned.
- When you get to the Armory room and hit the switch, you will see a cutscene and the mission will be cleared. You will obtain the Book of Partholon and the keyword Uroborus. Exit the mission manually.
- Complete the quest (20,000 EXP) and wait for the next one.
|
The Book of Partholon


|
Name
|
The Book of Partholon
|
NPC
|
Sinead, Arzhela
|
| Information
|
WARNING TO ROYAL ALCHEMIST
If you helped someone with pages before receiving the quest, DO NOT complete the book until the quest tells you to. Otherwise, credit will not be given and you will be stuck on the quest.
|
| Instruction
|
- Talk to Sinead.
- Talk to Arzhela.
- Talk to Sinead to receive an empty collection book, Book of Partholon, and the Tara shadow mission, Seven Pages. Your goal is to gather seven Book of Partholon Pages for the Book of Partholon.
- You may bring a Royal Alchemist to assist you.
- You can get a single page from the end chest or you can gather pages from knocked down Leprechauns. Knock down Leprechauns without killing them, then click on them with bare hands to gather a page.
- You can gather up to 3 times from one leprechaun. However, you may only gather one page per knockdown. Pages will be bound to the player and can not be traded.
- A weak pet's Firebolt, Smash, or summoning attack such as a Cosmic Stallion's Fire Storm can knock them down without defeating them. A Fynni Pet can be most useful because they are weak enough to let you knock down leprechauns at least twice.
- If you're getting help from a Royal Alchemist, two treasure chests will spawn at the end. Both chests will always have the same page in them.
- The first room on the right will always spawn a Leprechaun. It is advised to gather from this Leprechaun, then exit and re-enter the mission. Repeat until you have obtained all 7 pages.
- If you clear and/or exit the mission, you will automatically receive it again. If you give up the mission before completing the book, you can talk to Sinead to receive it again.
- After completing the collection book, open the book and press "Collect Reward" to receive the Partholon Stone (2x2). If you still have it, you will need to give up the mission, Seven Pages, to receive missions further in the story.
- Complete the quest (35,000 EXP) and wait for the next one.
|
Partholon Stone


|
Name
|
Partholon Stone
|
NPC
|
Sinead, Belita, Lucas
|
| Information
|
You must have the quest in order to enter this special version of Peaca, otherwise you will be redirected into a normal version of the dungeon. If another party member has the quest, they will get the quest requirement completed as well.
|
| Instruction
|
- Talk to Sinead. You will receive a Red Wing of the Goddess to the Calida Exploration Camp.
- Talk to Belita to receive Belita's Letter (2x2). The stone will disappear and you will receive a Wings of the Blue Goddess to Emain Macha.
- Talk to Lucas inside the Bean Rua and give him the letter. He will give you a Red Wing of the Goddess to Peaca Dungeon and an Underwear Set.
- Head to Peaca Dungeon and drop the Underwear Set on the altar.
- You may bring up to 7 other people to assist you.
- It is a short and easy single floor version of Peaca Normal with 1 to 3 enemies per room, with up to 3 waves per room.
- Be prepared to fight Wights. Wights are immune to all melee damage including ninja and chain skills. If your magic is not very strong consider using Water Cannon. Even at a low rank, it can deal a considerably large amount of damage
- Lucas will be the end boss. Upon defeating him, a short cutscene will occur and you will be given a Red Wing of the Goddess to Calida Exploration Camp. You may stay and loot the end chest after the boss room.
- If you lose the underwear set given to you by Lucas, you can buy another from an NPC to re-enter the dungeon.
- Talk to Belita to receive the Partholon Crystal (1x1).
- Complete the quest (28,000 EXP) and wait for the next one.
|
Shock


|
Name
|
Shock
|
NPC
|
Sinead, Leymore
|
| Information
|
In this quest, you will learn the Shock skill. After learning it, you may talk to Heledd to receive the quest for learning Shock Rank F. See the Shock skill page for more information.
|
| Instruction
|
- Talk to Sinead to receive the Shadow Mission, Ancient Alchemy. You are given a Wings of the Blue Goddess to Taillteann's Stonehenge.
- Enter the solo Shadow Mission at Taillteann's Altar. You have 30 minutes to complete this mission.
- This mission is very similar to Dorren's Request, however you will start near the alchemy ovens and Leymore.
- Head to the center of the town to find the four switches. Each switch will spawn enemies that may drop one of the four reagents: Dark Oil, Unstable Darkness Crystal, Stone Crystal, and Magic Crystal. Each switch corresponds to exactly one reagent.
- You do not have to perform Synthesis. You must bring the four reagents back to Leymore.
- Speak to Leymore after collecting the reagents to view a cutscene and complete the mission.
- As a reward you will be given Novice-rank Shock skill and 5 Shock Crystals.
- Shock crystals are no longer required to use the Shock skill, instead it requires 2 Wind Crystals and 1 Fire Crystal.
- The Shock Crystals can be exchanged with Eabha for 2000 gold each.
- Complete the quest (30,000 EXP) and wait for the next one.
|
Evolution of the Brionac

|
Name
|
Brionac's Evolution
|
NPC
|
Aer, Collen
|
| Information
|
|
| Instruction
|
- Prevent the Caliburn from evolving into the Brionac.
- Enter Aer's chamber at Ceo Island and a cutscene will occur.
- If you are already in the chamber when the quest arrives, you will need to exit and re-enter to trigger the cutscene.
- After the cutscene, you will be automatically moved to Collen in Taillteann. You will also obtain the Shadow Stone (2x2).
- Talk to Collen.
- Complete the quest (35,000 EXP) and wait for the next one.
|
Tir Na Nog

|
Name
|
Tir Na Nog
|
NPC
|
Collen, Leymore, Neamhain
|
| Information
|
Important: Bring any Cylinder Weapon and some Fire Crystals and Wind Crystals before entering the shadow mission. You will need them to use the Shock skill.
|
| Instruction
|
- Talk to Collen to receive the solo Tara Shadow Mission, Jenna in Danger. You will also receive a Wings of the Blue Goddess to Tara Stonehenge.
- This mission is fixed at Basic difficulty.
- Speak to Leymore once inside the Shadow Realm, then equip the Cylinder preparing to use the Shock skill.
- Head west towards the waterfall until a cutscene occurs. You will be moved to a ritual altar.
- After the cutscene, Leymore will start attacking Neamhain as a decoy. Neamhain is immune to damage; do not engage her.
- Use Shock on yourself and then click on the floating Brionac to get a cutscene. The mission will complete and exit.
- You learned novice-rank Shock in an earlier quest. It can be used at novice rank.
- Shock is an alchemy skill that allows you to set an electric effect onto your target that emits shockwaves to nearby enemies. Once you have loaded Shock, you may target yourself, a party member, a pet, your own summoned Golem, or an enemy. Whatever your target is, the shockwaves will attack your enemies. Shock has a 60 second cooldown.
- Although you can target other beings for Shock, you will want to use it on yourself during this quest. Because it has a long cooldown, you will not get a second opportunity to use it if you accidentally target something else.
- Leymore can take up two volleys of Fury of Light, after which he will be defeated and the mission will fail.
- You will receive Brionac as your reward (1x5). This is not a usable weapon yet: just an inventory item.
- Complete the quest (25,000 EXP) and receive the next quest immediately.
|
Goddess Needle

|
Name
|
Goddess Needle
|
NPC
|
|
| Information
|
|
| Instruction
|
- You will receive the Tara shadow mission, Location of Destiny, and the item, Goddess Needle (2x2).
- The mission takes place in the courtyard before Rath Royal Castle. The difficulty of this mission is not fixed and may scale all the way up to Hard depending on your character's total level.
- You must fight 9 waves of python soldiers and shamans leading to Rath Royal Castle's front doors.
- After defeating the enemies, a cutscene will occur. You will fight Python Knight and a large group of soldiers and shamans. The soldiers and shamans are single aggro but Python Knight will always target you in addition.
- Your goal is to get targeted by Python Knight's Shadow Death attack and quickly use the Shadow Stone to absorb it. His minions are a distraction and should be defeated to be removed from play. You must absorb shadow death three times to continue the mission.
- Shadow Death is an attack with a wind up animation which shows a pulsing shadow under Python Knight.
- Once he begins the animation, his aim will be fixed in your direction. You may step aside to avoid it.
- Once done with the animation, Shadow Death projectile will move in a straight line where he aims it. It moves at about human running speed and appears to be as wide as Python Knight himself.
- If it passes through you, you will be knocked unconscious in just a few seconds. You will prevent death if you use the Shadow Stone during that time. The first time and second time, the screen will flash to indicate you've used the stone. The third time, a cutscene will play.
- It is advised that you move the Shadow Stone to a convenient location in your inventory and be ready to use it with CTRL+Click when you are targeted. You may mash CTRL+Click on the Shadow Stone to make sure it gets used.
- It's easier to prepare for Shadow Death if you defeat his minions and keep Python Knight away at a distance.
- After absorbing Shadow Death thrice, a cutscene will occur. The Shadow Stone will disappear from your inventory. You will then have Awakening of Light active for the remaining mission and Shadow Spirit will be available at rank F.
- If you fail the mission after losing the Shadow Stone and gaining the Shadow Spirit skill, the Shadow Stone will be restored to your inventory upon re-entering the mission.
- After the cutscene, Python Knight will have more minions. Quickly add Shadow Spirit to a hotkey and be ready to use it on them.
- Shadow Spirit is a skill which can target the corpses of defeated enemies and absorbs their souls to be used against others.
- Be cautious, Python Knight can still use Shadow Death against you and if you get touched by it you will be knocked unconscious because you no longer have the Shadow Stone. Always be ready to move out of the way.
- Use Shadow Spirit on Python Knight's defeated minions to absorb souls and then use it again on him to stun him and make him vulnerable to attacks. When he is vulnerable, attack him until he is defeated.
- Warning: The Python Knight will remain immune to Magic even after he is made vulnerable to attacks.
- After defeating the Python Knight, a cutscene will occur and the mission will exit.
- If you fail the mission you will automatically receive it again. If you give up the mission, you can use the Goddess Needle to receive it again.
- Complete the mission (36,000 EXP). You will lose the Goddess Needle.
- Wait for the next quest.
|
Caliburn Pass

|
Name
|
Caliburn Pass
|
NPC
|
Padan, Cai
|
| Information
|
|
| Instruction
|
- Talk to Padan to receive the Tara shadow mission, To the Altar of Caliburn.
- You may bring up to 7 other people to assist you.
- The shadow mission takes place south of the Pontiff's Court, near the river.
- Talk to Cai to begin and have him follow you.
- Head down the dirt road to spawn the enemies. You will battle numerous waves of Python Soldiers and Python Shamans with a large amount of them per spawn. The boss is a Python Wizard, surrounded by minions.
- If Cai dies, the mission will fail.
- If you are with a party, one member could talk to Cai at the beginning and remain in conversation for the duration of the mission to prevent him from walking down to the enemies.
- If you have completed Generation 8, you can use Dragon Support while staying on the cliff. Be aware of your party's surroundings and where they are at when attempting to use the horn.
- Using a skill with a very large area of effect such as Chain Sweep at high rank is very effective and can make the mission easily solo-able.
- Complete the mission and receive Caliburn Pass (2x2).
- Complete the quest (40,000 EXP) and immediately receive the next one.
|
Uroborus

|
Name
|
Uroborus
|
NPC
|
|
| Information
|
Once the Python Shamans are defeated, you will be facing 4 Urobori. You will have the choice of either fighting them with a fixed camera angle, or your own camera angle. Due to the size of the battlefield, using the fixed angle is recommended, as you can keep and eye on all 4 Urobori.
Once you defeat an Uroborus, it can still harm you with its flame attacks. Keep this in mind as you continue the battle.
Having a fast mount is recommended (but not necessary) due to the distance in between each Uroborus and benefits the player in escaping harm.
|
| Instruction
|
- Recover the Caliburn.
- You will automatically be given the Tara shadow mission, Final Chapter. You may bring up to 2 other players to assist you.
- The mission takes place at the shadow realm version of the hanging garden at Rath Royal Castle.
- You will fight 4 Python Shaman before Uroborus comes to life. The Uroborus is a boss enemy with 4 snake heads.
- Each head of the Uroborus is composed of two parts: the head and the body. The head cannot be attacked until its body is weakened.
- Each head of the Uroborus will attack you if you are within their range. Their attack is a projectile and it and travels moderately slow.
- You can avoid their attack if you keep moving. It's best to lure them to attack a spot, then move out of that spot and attack while its projectile is in flight and before they wind up to attack you again.
- As with any mission where quick movement is important, using March Song (and Breath of Ladeca, if you are Human) can make it easier to evade the enemy's attacks.
- Using a Chain Blade and Anchor Rush can make the fight much easier because it lets you move quickly and attack from a distance.
- A defeated Uroborus head will turn black, become invulnerable, and continue to attack until all 4 heads are defeated.
- For more information on the Uroborus, you may visit the Uroborus page.
- You must defeat all 4 of the heads to clear the mission and get a cutscene.
- There is a bug with Redoubled Offensive and bleeds (such as Sword Smash, etc.) that will bypass Uroborus' mechanics and kill the boss instantly despite the intended battle strategy.
- Due to a bug, a dead Uroborus head may revert to being colored during the fight. The head still counts as dead and will continue to be invulnerable to damage.
- If you fail the mission or give it up, you can use Caliburn Pass to receive it again.
- You will receive the Brionac (the weapon) as a reward upon completing the mission.
- Complete the quest (25,000 EXP) to receive the Caliburn enchant scroll.
|
< Generation 10: Goddess of Light Generation 12: Return of the Hero >
 Story Contents Story Contents |
|---|
| | Main Storyline |
| | | Sidequests |
| Chapter 1 | | | | Chapter 3 | | | | Chapter 4 | | | | Chapter 5 | | | | Chapter 6 | | | | Chapter 7 | | | | Arcana | |
| | | Removed Story Contents | | |
 Game Scripts Game Scripts |
|---|
| | Chapter 1 | | | | Chapter 2 | | | | Chapter 3 | | | | Chapter 4 | | | | Chapter 5 | | | | Chapter 6 | | | | Chapter 7 | | | | Arcana | | | | Other | |
|
|