Mabinogi World Wiki is brought to you by Coty C., 808idiotz, our other patrons, and contributors like you!!
Want to make the wiki better? Contribute towards getting larger projects done on our Patreon!
Guide:Awakened Abyssal Lord
Description
Phase 1
Defeat 3 waves of enemies in Tranquility Reach within the time limit
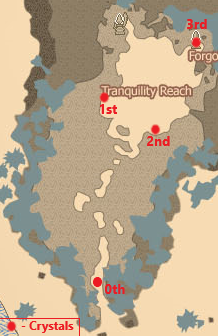
- This phase requires you to hit 3 crystals with 3 waves of monsters, spawning 1 wave per crystal. The 0th crystal starts the timer in which you are given a certain amount of time depending on the difficulty.
- The monsters have high aggro range as well as high damage.
| Difficulty | Normal | Adv. | Elite |
|---|---|---|---|
| Seconds | 200 | 150 | 100 |
- Two bars appear upon hitting the 0th crystal; Barrier Activation Energy and Barrier Destruction Energy.
- Barrier Activation Energy indicates how much time is left. When this bar reaches 100%, the mission fails.
- Barrier Destruction Energy indicates how many monsters need to be killed in order to hit the next crystal. After hitting the next crystal, this bar resets to 0%.
- Each monster killed fills 10%. In other words, you need to kill 10 monsters per wave in order to fill the bar.
- Each crystal has a red zone surrounding it that drains your health. (% per second)
- The 3rd crystal is protected by 4 crystals surrounding it that must be destroyed before hitting the 3rd crystal and continuing to the next phase.
The first wave spawns 15 Enraged Turtles in a circle slightly north of the 0th crystal.
The second wave spawns 15 Enraged Millipedes in a circle between the 1st and 2nd crystal.
Tips
Divine Link is highly recommended during the entire phase as they let you easily control and group the monsters. Crowd control skills such as Crisis, Spinning Slasher or Death Mark should then be used for more crowd control, after which Chain Sweep and other abilities can be stacked on top of each other.
- Obtaining Dorcha: There are monsters outside of the Scuabtuinne area that can be hit to obtain full Dorcha prior to beginning the mission.
As monsters spawn in a circle, party members should stay grouped in the middle in order for the mobs to aggro closer. This allows for an easier control of the mobs.
After hitting the 2nd crystal, one person should go ahead and destroy the 4 crystals surrounding the 3rd crystal as this takes quite a bit of time. Becareful not to aggro any monsters as you'll easily hit deadly while destroying the 4 crystals due to the red zone.
Elite Tips
In Elite difficulty, this Phase is easily the most difficult phase in the entire mission as you are only given 100 seconds to complete the entire phase. This phase can be entirely cheesed using Divinity and Nova Obliteration. Outside of Scuabtuinne, use Celestial Spike on the Haunted Corals in order to get full Amplification Levels. Using Bone Chips, BFO and a Step 6+ Red Upgrade weapon, a single Nova Obliteration can clear an entire wave. With a full party, have 3 party members use one Nova per wave while the 4th member uses BFO and hits the crystals.
Phase 2
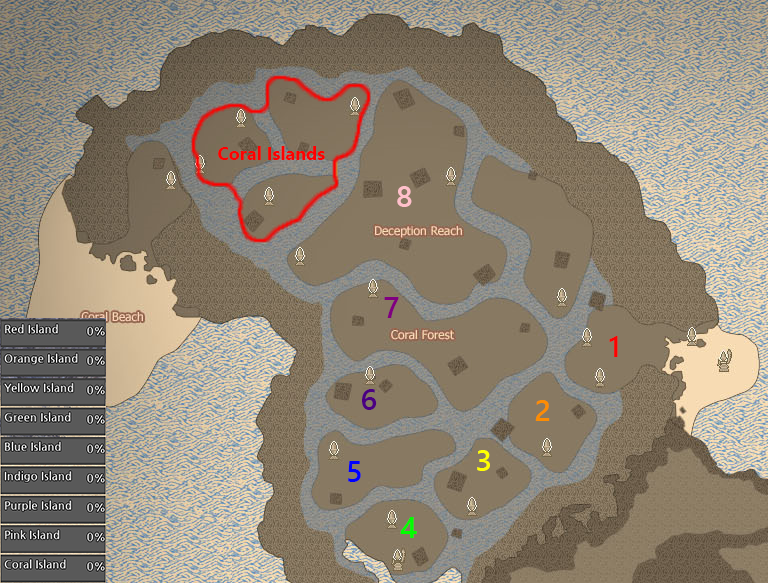
Clear the 11 islands of Deception Reach. Kill the monsters in each island to proceed onto the next island.
Mimics in this phase drop Barrier inks, Unadorned Commander's Emblem, and Runes used to create the Commander's Emblem.
Red Island
Immediately after finishing the first phase you'll teleport here.
Only the 4 Coral Reef Carnivorous Plant closest to the crystal is required to proceed to the Orange island.
Orange Island
Defeat 3 Haunted Coral Reef Ghosts and 3 Coral Reef Carnivorous Plants.
Yellow Island
Defeat 4 Coral Reef Carnivorous Plants.
Green Island
Defeat 3 Haunted Coral Reef Ghosts and 3 Coral Reef Carnivorous Plants.
Contains 1 Mimic.
Important: There is a hidden Far Darrig in the Coral Bushes by the crystal. Using Phantasmal Sight on this Far Darrig enables you to skip the Blue (5) and Indigo (6) Islands.
Blue Island
Indigo Island
Purple Island
Defeat 3 Haunted Coral Reef Ghosts and 9 Coral Reef Carnivorous Plants.
Contains 1 Mimic.
Pink Island
Defeat 3 Haunted Coral Reef Ghosts and 6 Coral Reef Carnivorous Plants.
Contains 1 Mimic.
Coral Islands
Used Phantasmal Sight and hit a single coral which makes one of the outer corals shine. Hitting the right one will enable you to proceed. If you hit the wrong one, 3 Haunted Coral Reef Ghosts will spawn. It is recommended that you desummon your pets and only have one of your party members hit the corals.


